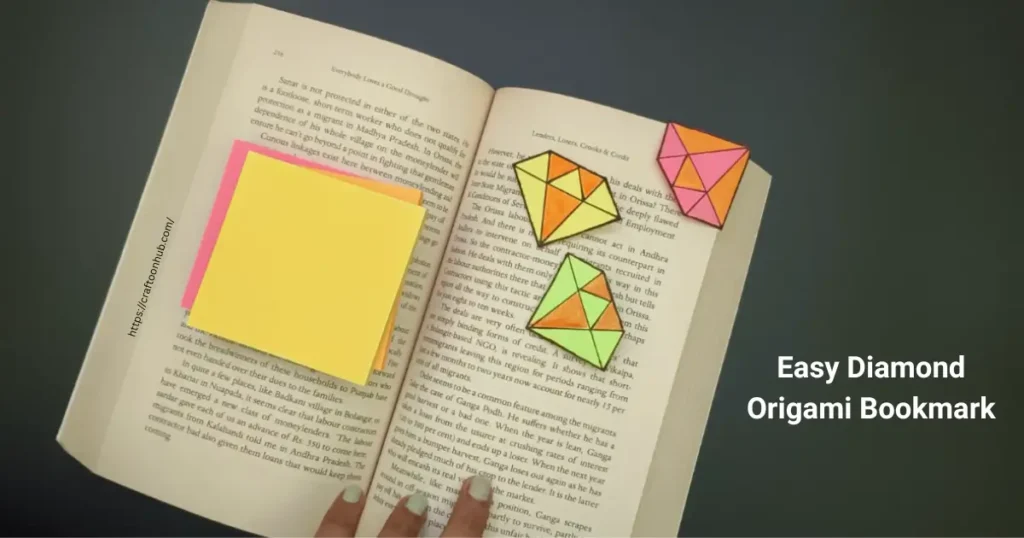
If you love paper crafts and want a quick, creative project, this guide is perfect for you! In this tutorial, you’ll learn how to make an Easy Diamond Origami Bookmark Using Sticky Notes — a fun and useful DIY that anyone can do. Whether you’re a student, a craft lover, or someone who enjoys handmade touches, this project is simple yet beautiful. You only need a sticky note, your hands, and a spark of creativity! This sticky note origami craft adds charm to your books while keeping your reading neatly organized.
Why Try This DIY Corner Bookmark Idea
Before we jump into folding paper, let’s understand why this small craft project is worth your time. A DIY corner bookmark idea like this one is perfect because:
- It helps you reuse everyday stationery like sticky notes.
- You can make it in under 5 minutes.
- It’s an excellent creative break from your daily routine.
- You can personalize it with drawings, stickers, or patterns.
- It makes a great handmade gift for book lovers or friends.
Moreover, origami is known to enhance focus, improve patience, and promote mindfulness. When you fold paper carefully, it relaxes your mind — making it a simple yet calming hobby.
Materials You’ll Need
Creating your own diamond origami bookmark is super simple and requires very few materials. Here’s what you need:
- 1 sticky note (preferably 3cm x 3cm or 5cm x 5cm size)
- A black marker or pen
- Your favorite color pens or markers for decoration
- Optional: Glitter pens, stickers, or washi tape for styling
That’s it! No scissors, no glue, and no extra supplies.
Step-by-Step Easy Origami Bookmark Tutorial
Now let’s get to the fun part — making your Easy Diamond Origami Bookmark Using Sticky Notes. Follow these steps carefully, and you’ll end up with a neat, cute, and perfectly shaped bookmark.
Step 1: Take a Sticky Note
Start by taking one 3cm x 3cm sticky note. You can also use a 5cm x 5cm sticky note if you want a slightly larger bookmark. Make sure the sticky side (the part with glue) is at the top so that it doesn’t interfere with your folds later.
Step 2: Fold into a Triangle
Fold the sticky note from one corner to the opposite corner to create a perfect triangle. Ensure the edges are lined up neatly and no part of the paper sticks out. Press the fold gently with your finger to make a sharp crease. This forms the base for your bookmark.
Step 3: Position the Triangle
Once your triangle is ready, keep the longest side (the base) facing toward you. The pointed tip should be at the top, and the right angle should be pointing upward.
Step 4: Fold the Bottom Corners Up
Now, fold the bottom right corner of the triangle upward so that its point meets the top tip of the triangle. Do the same with the bottom left corner. Both sides should meet neatly at the top point. Press down gently to form clean creases.
Step 5: Open Both Folds
Next, open both folded corners back down. These crease marks will guide your next step, so don’t skip this part.
Step 6: Fold the Top Layer Down
Now, take only the top layer of the triangle and fold it downward toward the base. Be careful not to fold both layers. This fold will create a pocket, which is the main part of your bookmark.
Step 7: Slightly Fold the Remaining Top Layer
To make the shape look neat and even, slightly fold the remaining top layer downward. This small adjustment helps your diamond origami bookmark look symmetrical and professional.
Step 8: Tuck the Corners In
Take the right corner again and fold it upward, tucking its top part gently into the pocket you just created. Do the same with the left corner. Make sure both sides are tucked evenly and press them down lightly so the folds stay in place.
Step 9: Admire Your Bookmark
Congratulations! Your basic sticky note origami craft is ready. You now have a simple and elegant bookmark that fits neatly on the corner of any page.
Turn It into a Diamond Bookmark
This is where the magic happens! You can now convert your triangle bookmark into a stunning diamond design.
Step 10: Draw an Outline
Take a black marker and carefully draw an outline around the folded shape. This will highlight the diamond structure and make it stand out. Try to keep the lines smooth and even.
Step 11: Add Colour
Next, color your bookmark using your favorite shades. You can use a single color for a classy look or mix shades for a creative pattern. Choose whichever color you want your diamond origami bookmark to be!
Step 12: Personalize It
You can make your design even more stylish by adding glitter outlines, stickers, or small doodles. A metallic pen or gel pen will also make it sparkle beautifully under light.
Creative Decoration Ideas
If you love to experiment, here are a few fun ways to decorate your DIY corner bookmark idea:
- Add eyes and a smile to turn it into a cute face bookmark.
- Use patterned sticky notes for a unique design.
- Write inspirational quotes inside the diamond shape.
- Add glitter dust or shimmer pens for an elegant touch.
- Stick small gemstones or sequins to make it pop.
These small details will make your bookmark more personal and fun to use.
Why Use Origami Bookmarks Instead of Regular Ones
Using an origami bookmark made from sticky notes is much better than using plain paper slips. Here’s why:
- Eco-friendly: You reuse sticky notes instead of wasting new paper.
- Customizable: You can make different colors and patterns for every book.
- Secure Fit: The corner pocket keeps your page safe without slipping out.
- Budget-Friendly: It’s free if you already have sticky notes at home.
- Creative Expression: It reflects your personality and creativity.
This small craft might look simple, but it teaches you patience, creativity, and precision — essential qualities for all DIY lovers.
Fun Variations to Try
Once you master this easy origami bookmark tutorial, you can explore other creative variations:
- Heart-Shaped Bookmark
- Animal-Themed Bookmark
- Geometric Bookmarks
- Mini Bookmarks
The possibilities are endless. You just need imagination and a few minutes!
Pro Tips for Perfect Origami Folds
If you want your sticky note origami craft to look neat and sharp, follow these expert tips:
- Always fold on a flat, hard surface for clean creases.
- Use the edge of a ruler or your nail to sharpen folds.
- Avoid using old or curled sticky notes — fresh ones work best.
- If your paper is slippery, press it down for a few seconds after each fold.
- Keep your hands clean and dry to avoid smudges.
With these small tricks, your diamond origami bookmark will look professionally made!
Benefits of Making Origami Crafts
Did you know that doing origami has many mental and emotional benefits? Here’s how this small sticky note origami craft helps you:
- Relieves stress and helps you stay calm.
- Improves concentration and focus.
- Boosts hand-eye coordination.
- Encourages creativity and imagination.
- Brings a sense of achievement when you complete your design.
That’s why origami is often recommended for both kids and adults. It’s a hobby that makes you feel peaceful while learning something new.
How to Make Bookmark with Sticky Notes – Quick Recap
Let’s summarize all the steps you learned in this post about how to make bookmark with sticky notes:
- Take one sticky note and fold it into a triangle.
- Fold the corners up to meet the top point.
- Unfold and fold only the top layer down to form a pocket.
- Tuck both corners neatly into the pocket.
- Draw an outline to form a diamond shape.
- Add color, designs, and decoration.
And that’s it! In just a few minutes, you’ll have your very own diamond origami bookmark — unique, colorful, and handmade.
Conclusion
Crafting your own bookmark might seem like a small thing, but it brings great joy. With this Easy Diamond Origami Bookmark Using Sticky Notes, you’re not only making something practical but also exploring your creative side. The best part is — you can make several of them in different colors, gift them to friends, or even sell them at a craft fair!
Origami crafts are proof that even a tiny piece of paper can turn into something artistic and valuable. So, grab your sticky notes, pick your favorite shades, and start folding today!
Next time you open your favorite book and see your handmade diamond bookmark shining from the corner, you’ll feel proud of creating something yourself. Remember — creativity doesn’t need expensive tools; it starts with simple things like a sticky note and an idea. So, keep experimenting with your DIY corner bookmark idea and make every reading moment more colorful and fun!
FAQ Related to:
How can I make an easy diamond origami bookmark using sticky notes?
You can make a diamond origami bookmark by folding a square sticky note into a triangle, creating a pocket, and tucking in the corners neatly. It takes less than five minutes and needs no glue or scissors.
What is the simplest way to fold a sticky note into a bookmark?
Start by folding a sticky note diagonally into a triangle, then fold the corners upward and tuck them into the pocket you’ve made. Smooth the edges, and your bookmark is ready to use.
Can I make a corner bookmark without scissors or glue?
Yes! This DIY corner bookmark idea requires only a single sticky note. The folds themselves hold the shape together, so you don’t need any glue, tape, or scissors at all.
What size sticky note is best for making origami bookmarks?
The best size for a neat and easy-to-fold origami bookmark is 3×3 cm or 5×5 cm. These sizes are perfect for fitting snugly onto the corner of your book pages.
How do I decorate my DIY diamond origami bookmark?
You can use color pens, markers, glitter, or stickers to decorate your diamond bookmark. Add outlines, patterns, or cute faces to make it unique and match your personal style.