If you’re looking for a creative and fun way to engage your kids this winter, this DIY Easy Penguin Craft for Kids is a perfect choice. It’s an enjoyable winter paper activity that encourages imagination, creativity, and fine motor skills. Whether you’re a parent, teacher, or craft lover, this adorable penguin project will bring joy and learning together. The best part? It’s budget-friendly, quick, and simple to make using everyday materials. In less than 30 minutes, you’ll have a charming penguin ready to brighten up any room. So, grab your paper, glue, and scissors—it’s crafting time.
Why Try a Penguin Craft This Winter?
Winter is the perfect season for cozy indoor fun. Kids often spend more time indoors, and crafting becomes a wonderful way to keep them engaged while learning something new. Penguins symbolize winter joy and cuteness, which makes them an ideal theme for craft activities.
Creating a DIY Penguin Paper Craft also encourages kids to explore textures, colors, and shapes. It helps them understand simple concepts like symmetry, balance, and proportion — all while having fun. Moreover, handmade penguins can be used for decoration, greeting cards, or even as classroom displays during winter festivals.
Materials You’ll Need for This DIY Penguin Paper Craft
Before starting your Winter Penguin Craft for Kids, gather the materials you’ll need. Most of them are simple and inexpensive.
You’ll need:
- Black paper (for the penguin’s body and wings)
- White paper (for the belly)
- Yellow or orange paper (for the beak and feet)
- Googly eyes (or white paper and markers to draw eyes)
- Pencil
- Scissors
- Glue stick or craft glue
- Optional: Glitter, cotton, or markers for decoration
Having everything ready before you start makes the crafting process smooth and enjoyable.
DIY Easy Penguin Craft for Kids (Step-by-Step Guide)
Let’s now explore how to make this adorable penguin step by step. Even beginners will find this Penguin Craft Step by Step guide super easy and fun to follow.
Step 1: Draw the Penguin Shape
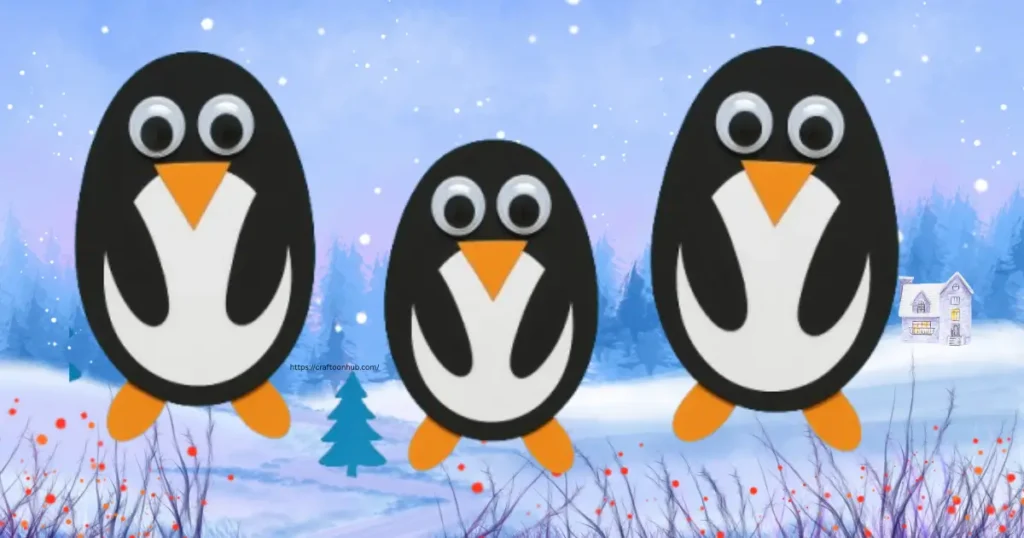
Take a black paper of your chosen size. The size will determine how big or small your penguin will be. Using a pencil, draw an oval or egg-shaped outline for the penguin’s body. You can make it tall and slim or short and chubby — every penguin design looks cute!
Once you’re satisfied with your shape, use scissors to carefully cut along the outline. This will be your penguin’s main body base.
Step 2: Add the White Belly
Next, take a white paper and draw a slightly smaller oval or circle. This will form the penguin’s belly. Cut it out and make sure it fits well inside the black body shape.
Now, apply glue to the back of the white circle and gently stick it on the penguin’s body, leaving a little space at the bottom for the feet later. This simple step instantly gives your penguin that adorable two-tone look.
Step 3: Create and Attach the Eyes
Take two googly eyes and stick them on the upper part of the penguin’s face using glue. If you don’t have googly eyes, you can easily make them using white paper. Cut two small circles, draw black dots in the center with a marker, and glue them in place.
The eyes bring life and personality to your penguin, so position them carefully — a little tilt can make your penguin look funny, sleepy, or curious!
Step 4: Make the Beak
Now it’s time to give your penguin a beak! Take yellow or orange paper and cut a small triangle. The size should match your penguin’s head. Apply a small amount of glue and stick it below the eyes.
For extra fun, you can fold the triangle slightly in the middle to give the beak a 3D look. This adds a playful touch and makes your penguin more realistic.
Step 5: Add the Wings
To make the wings, take the leftover black paper. Cut two long oval shapes or teardrop-like pieces for the penguin’s flippers. You can either glue them flat on the sides of the penguin or bend them slightly forward to give a layered effect.
This part allows kids to experiment — they can position the wings to make the penguin look like it’s waving or flapping happily.
Step 6: Make the Feet
For the penguin’s feet, use yellow or orange paper again. Draw two small oval-shaped pieces to resemble webbed feet. Cut them out carefully, then glue them at the bottom of your penguin’s body, slightly overlapping the white belly.
This final touch completes your cute little penguin’s look!
Step 7: Decorate and Personalize
Now comes the most fun part — decorating your penguin! Kids can get creative by adding accessories like scarves, hats, or earmuffs using colored paper or cotton. You can also use markers to draw snowflakes or glitter to add a frosty sparkle.
Encourage children to name their penguin and maybe even create a penguin family! This builds emotional connection and makes the craft even more enjoyable.
Simple Penguin Craft Ideas for All Ages
If your kids loved this DIY Penguin Paper Craft, there are many ways to take it further. Here are some Simple Penguin Craft Ideas to try:
- Penguin Family Collage – Create penguins in different sizes to represent family members. Add a snowy background using cotton or white paint.
- Penguin Greeting Cards – Stick your penguin on folded cardstock to make winter-themed greeting cards.
- 3D Penguin Model – Roll black paper into a cylinder, add wings and a belly, and make a standing 3D penguin.
- Penguin Puppet – Glue your penguin to an ice cream stick to make a puppet for storytelling or fun playtime.
- Penguin Snow Globe – Place your paper penguin inside a transparent plastic cup with fake snow for a DIY snow globe effect.
These variations turn a simple craft into hours of engaging fun and learning.
Educational Benefits of Penguin Crafts
Crafting isn’t just about fun; it’s also educational. When children make this Winter Penguin Craft for Kids, they’re unknowingly developing valuable skills.
- Fine Motor Skills: Cutting, gluing, and arranging small pieces improve hand-eye coordination.
- Creativity & Imagination: Choosing colors, designing accessories, and customizing details boost creativity.
- Patience & Focus: Following a Penguin Craft Step by Step process teaches kids to follow directions carefully.
- Emotional Expression: Creating a cute character allows kids to express feelings through art.
- Cognitive Learning: Kids can learn about penguins, their habitats, and winter themes while crafting.
Parents and teachers can also integrate storytelling or fun facts about penguins to make the session more educational.
Tips for a Perfect DIY Penguin Paper Craft
Here are some expert tips to make your penguin craft smooth and stress-free:
- Use thicker paper: Construction paper or cardstock works better than thin sheets.
- Plan your layout first: Arrange all parts before gluing to ensure balance.
- Let glue dry completely: Especially before adding decorations.
- Encourage independence: Let kids make small design choices — it boosts confidence.
- Store neatly: Keep the finished penguin in a dry place to prevent paper wrinkles.
These little tricks will help make your Easy Penguin Craft for Kids neat and lasting.
Creative Winter Activity for Family Fun
When the weather outside is chilly, spending time indoors doing crafts is a heartwarming way to connect as a family. This DIY Easy Penguin Craft for Kids can become a memorable weekend project that everyone enjoys.
You can even organize a small “Penguin Craft Challenge” at home — see who creates the funniest or most stylish penguin! Add background music, serve some hot cocoa, and turn your crafting time into a mini winter celebration.
This activity is also ideal for teachers planning Winter Penguin Craft for Kids lessons. It can fit perfectly into themes like “Animals of the Polar Regions,” “Winter Holidays,” or “Art & Nature.”
Eco-Friendly Crafting Tip
Want to make your penguin craft even more meaningful? Try using recycled paper, old magazines, or leftover wrapping paper. Teaching kids to reuse materials encourages sustainability and creative thinking.
You can also make your penguin’s scarf from old fabric scraps or cotton. This not only reduces waste but adds a tactile experience to the project.
Display Your Penguin Masterpiece
Once your penguin is complete, show it off proudly! Stick it on your fridge, decorate your study table, or hang it on a wall string with fairy lights for a cozy winter corner.
If you’re a teacher, display all students’ penguins on a classroom bulletin board with a snowy backdrop. It instantly brightens the space and fills it with winter charm.
You can even take photos of the finished crafts and create a “Penguin Parade” photo collage for family memories or social media sharing.
Encourage Storytelling and Imagination
After completing this DIY Penguin Paper Craft, ask your child to give their penguin a name and create a short story about its adventures in the snow. This sparks storytelling skills, creativity, and emotional engagement.
You can ask questions like:
- What is your penguin’s favorite food?
- Where does your penguin live?
- Does your penguin have friends or a family?
These little activities transform a simple craft into a full learning experience.
Why Parents and Teachers Love Penguin Crafts
There’s a reason why this Easy Penguin Craft for Kids is such a favorite among parents, teachers, and children alike. It’s simple to make, needs very little supervision, and uses easily available, budget-friendly materials. Plus, it’s perfect for all age groups, from preschoolers to early learners.
Parents love how this craft keeps kids calm, focused, and happily engaged without screens. Teachers appreciate how effortlessly it fits into winter art lessons or creative classroom themes. But the best part? Kids absolutely enjoy watching their cute paper penguin come to life step by step! Whether it’s for art time, a fun playdate, or a homeschool project, this Penguin Craft Step by Step guide always brings creativity and smiles together.
Conclusion
Crafting with kids isn’t just about art — it’s about connection, learning, and joy. Every little paper cut, glue dab, and color choice strengthens their creativity and confidence. This DIY Easy Penguin Craft for Kids perfectly combines imagination, hands-on learning, and winter fun in one adorable activity. It encourages focus, teamwork, and fine motor skills while letting children express their personality through their designs. Whether it’s a family craft night or a classroom project, this penguin craft brings smiles and warmth to chilly days, turning a simple piece of paper into a joyful, meaningful creation full of love and laughter.
So, the next time you want a simple and educational winter activity, try this DIY Penguin Paper Craft. It’s safe, easy, and endlessly fun for children of all ages. Grab your colored papers, some glue, and scissors — and let the happy penguin parade fill your home with creativity and cheer!
FAQ Related to:
How can I make an easy paper penguin craft for kids at home?
You can make a cute paper penguin using simple materials like colored paper, scissors, and glue. Just follow step-by-step instructions, and kids can fold, cut, and stick pieces to create their own penguin.
What materials do I need for a fun winter penguin craft activity?
All you need is black, white, and orange paper, scissors, glue, and optional markers or googly eyes. These basic supplies make it easy to create a fun and festive penguin craft at home.
Are there simple step-by-step instructions for DIY penguin paper crafts?
Yes! Most easy penguin crafts come with clear instructions. You simply cut out shapes for the body, wings, and beak, then glue them together. Kids can follow along easily and enjoy the process.
How long does it take kids to complete an easy penguin craft?
Depending on age, most kids can complete this craft in 15–30 minutes. It’s quick, fun, and perfect for a short creative activity at home.
Can preschoolers and beginners make a penguin craft without help?
Yes, with simple designs, preschoolers and beginners can make a penguin craft mostly on their own. Younger kids might need a little help with cutting or gluing, but it’s very kid-friendly.