Creating cute artwork is a fun and relaxing way to express your creativity, and this Easy Kawaii Strawberry Drawing Tutorial is perfect for beginners who want to start with something simple and adorable. In this guide, you’ll learn how to draw a sweet kawaii strawberry using clear steps, easy shapes, and gentle lines. Whether you’re new to drawing or just exploring kawaii art, this tutorial will help you gain confidence while enjoying every part of the process. With friendly instructions and beginner-friendly tips, you’ll be able to create a cute strawberry drawing that looks charming and full of personality.

Why Kawaii Art Is Perfect for Beginners
Before we start drawing, it helps to know why kawaii style is so beginner-friendly. Kawaii art focuses on simplicity, rounded shapes, cute faces, and minimal details. As a result, you don’t need advanced drawing skills to create something adorable. The charm lies in its simplicity. Even a basic shape can turn into a cute character when you add expressive eyes, blush, and a sweet smile.
In addition, kawaii drawings are relaxing. Each line is gentle, and the process encourages creativity without pressure. This makes kawaii art a great style for beginners, kids, students, and anyone who wants to unwind while still being creative.
Materials You Will Need
You don’t need expensive tools to follow this easy kawaii drawing tutorial. In fact, you can create a beautiful kawaii strawberry with whatever you already have at home. Still, here’s a list of recommended supplies:
- A sketchbook or plain drawing paper
- A sharp pencil
- An eraser
- Black pen or fineliner for outlining
- Colored pencils, markers, or crayons
- Optional: white gel pen for highlights
Even if you only have a pencil, that’s perfectly fine. You can still complete this cute strawberry drawing for beginners with just one tool. The key is to enjoy the steps, not to stress about fancy materials.
Kawaii Strawberry Drawing Tutorial
Now let’s break down the entire drawing process in a simple, beginner-friendly way. This section will guide you through a kawaii fruit drawing step by step using clear explanations and smooth transitions.
Step 1: Draw the Basic Strawberry Shape
Start by lightly sketching a rounded heart shape. A strawberry is slightly plump, with a curved bottom and a wider upper area. Don’t worry about making the shape perfect. Kawaii art embraces organic and uneven outlines because they make the drawing feel alive.
A helpful tip: Imagine drawing a soft, chubby heart without the sharp angles. This instantly creates the strawberry’s adorable appearance.
Once the outline looks good, move on to the next step.
Step 2: Add the Strawberry Leaves
Every strawberry has cute little leaves sitting at the top like a small, leafy crown. Draw three to five simple leaf shapes extending outward from the top. Keep their edges soft and rounded because sharp leaves can break the kawaii style.
Use curved lines for each leaf and make them slightly overlapping. This adds natural charm while keeping the shapes easy for beginners.
Move forward once you’re happy with how the leaves look.
Step 3: Draw the Kawaii Face
Now we get to the most important part—the cute expression! This is where your strawberry gets its personality. Here’s how to draw a classic kawaii face:
- Draw two big oval or round eyes.
- Add shiny highlights inside the eyes using tiny circles.
- Add the mouth—it can be a small “U” shape, a sideways smile, or a simple curved line.
- Optional: Add blush circles or small hearts near the cheeks.
Aim for soft, warm expressions. A happy face instantly brings your drawing to life.
Step 4: Add Seeds and Details
A strawberry isn’t complete without its tiny seeds. For this simple kawaii art tutorial, draw small raindrop-shaped or oval seeds scattered around the surface. Keep the spacing even but not too exact—kawaii art feels best when it’s not overly perfect.
You can also refine the leaves and outline the body with slightly thicker lines using a black pen. This step makes your drawing pop.
Step 5: Outline Your Drawing
Take your pen or fineliner and outline the whole drawing. Outlining is a key part of kawaii artwork because it gives clean edges and enhances the cute style. Use smooth, slow strokes. If your hand shakes a little, don’t panic—it still works! Slight imperfections make your art unique.
Once the outline is done, erase any pencil marks left underneath.
Step 6: Add Color
Use your favorite markers or colored pencils to fill in the colors. Most kawaii strawberries use:
- Bright red for the berry
- Yellow or orange for the seeds
- Green for the leaves
- Pink for blush
- White gel pen for eye highlights
Coloring is the fun part, so take your time and enjoy watching your artwork come to life.
Step 7: Add Background Details
To give the drawing more charm, add small background elements like:
- Tiny hearts
- Sparkles
- Dots
- Stars
- Bubbles
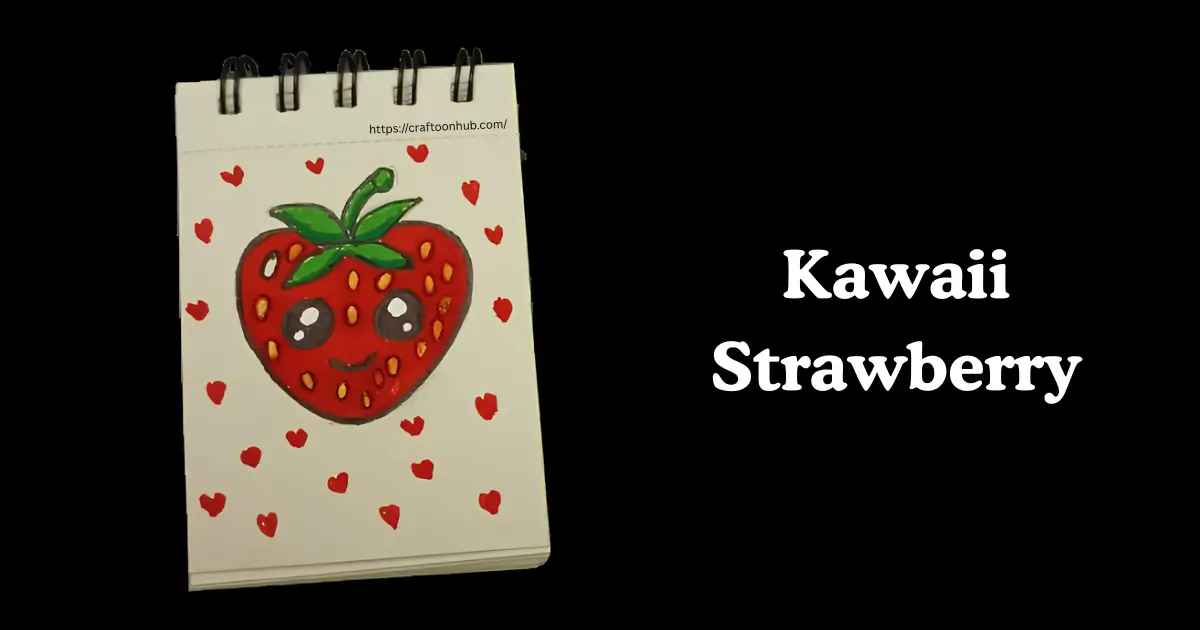
These details help bring attention to the main character and make the drawing feel complete. Your example drawing beautifully uses little heart shapes around the strawberry—simple yet adorable.
Why This Tutorial Works for Beginners
This easy kawaii drawing tutorial is intentionally designed with beginners in mind. Every step builds slowly and clearly on the previous one. You don’t need advanced skills, and you don’t need to stress about perfect lines or proportions.
In fact, kawaii art celebrates imperfections. This makes it ideal for young artists, hobbyists, or adults returning to drawing after a long break. Each element—from the simple shapes to the cheerful expression—creates an easy learning experience while helping you build confidence in your art.
Tips to Improve Your Kawaii Drawing Skills
As you continue practicing, here are some friendly tips to help you improve:
- Use Soft, Rounded Shapes: Kawaii art looks cutest when shapes are round and gentle. Sharp lines make the character look more serious.
- Exaggerate Expressions: Big eyes, tiny mouths, and blush make characters feel more expressive and emotional.
- Keep It Simple: Don’t overload your drawing with too many details. Minimalism is the essence of cute art.
- Practice Drawing Faces Separately: Practicing eyes, mouths, and expressions on separate pages helps you master cute expressions faster.
- Experiment With Colors: Try pastel versions, brighter hues, or even monochrome styles. It’s all about creativity.
Decorating Your Strawberry Artwork
Once your drawing looks exactly how you want, consider adding little decorations or placing it in creative settings like:
- A kawaii dessert
- A fruit family
- A strawberry holding a tiny sign
- A strawberry in a teacup
- A strawberry in a magical world
Small storytelling elements make your artwork even more fun to create and share.
Why Kawaii Strawberries Are a Great Starting Project
Strawberries have easy shapes, simple leaves, and an unmistakable look. This makes them ideal for beginners trying kawaii art for the first time. Even kids can follow the steps effortlessly.
In addition, strawberries symbolize sweetness, love, and joy. When turned into a kawaii character, they become even more heartwarming. That’s why a kawaii strawberry drawing is always a great art idea for scrapbooks, school projects, diaries, art journals, blogs, or social media content.
Conclusion
Drawing kawaii art is one of the most relaxing and rewarding hobbies anyone can try. In this Easy Kawaii Strawberry Drawing Tutorial for Beginners, you learned how a simple heart-like shape, cute face, gentle lines, and bright colors can transform into an adorable strawberry character.
By following this kawaii fruit drawing step by step, you not only created cute artwork but also discovered how enjoyable simple drawing can be. So keep practicing, keep experimenting, and keep having fun—your kawaii art journey has just begun!
FAQ Related to:
How do I draw a kawaii strawberry step by step for beginners?
To draw a kawaii strawberry, start by sketching a rounded heart shape for the body. Add simple leaf shapes on top, then draw two big oval eyes, a tiny smile, and small blush circles. Add seeds across the strawberry, outline the drawing with a pen, and finally color it using red, green, yellow, and white for highlights. Keeping every shape soft and rounded helps make it look cute.
What materials do I need for an easy kawaii strawberry drawing?
You only need basic materials: a pencil, eraser, drawing paper, black fineliner or pen, and coloring tools like markers or colored pencils. Optional tools like a white gel pen can add shiny highlights. Even if you only have a pencil, you can still follow the steps and create a cute result.
How can kids learn a cute strawberry drawing in a simple way?
Kids can learn easily by following simple shapes and repeating smooth lines. Encourage them to start with a chubby heart shape, then add big cute eyes and a smile. Kids love coloring, so letting them choose their favorite shades makes it fun. Keeping the instructions short, visual, and playful helps them understand quickly.
What are the easiest steps to make a kawaii fruit drawing?
The easiest method is to:
Draw a basic shape (like a circle, heart, or oval).
Add small, rounded details such as leaves or stems.
Draw a kawaii face using big eyes and a tiny mouth.
Outline the drawing and fill it with bright colors.
This simple formula works for any kawaii fruit—strawberries, apples, peaches, oranges, and more.
How do I draw expressive kawaii eyes on a strawberry character?
Start with two big oval or circle shapes. Add one or two small white circles inside each eye for highlights. Fill in the rest of the eye with black or dark color. Adding a small curved line above each eye works as an eyebrow to increase expression. Soft blush dots under the eyes make the character even cuter.
What is the simplest kawaii art tutorial for drawing fruits?
The simplest kawaii fruit tutorial focuses on basic shapes and adorable faces. Choose a fruit with an easy outline—like a strawberry, apple, or cherry. Break it down into simple steps: sketch the shape, add small leaves, draw a kawaii face, outline, and color. This type of tutorial is perfect for absolute beginners, kids, and anyone who enjoys cute, stress-free drawing.