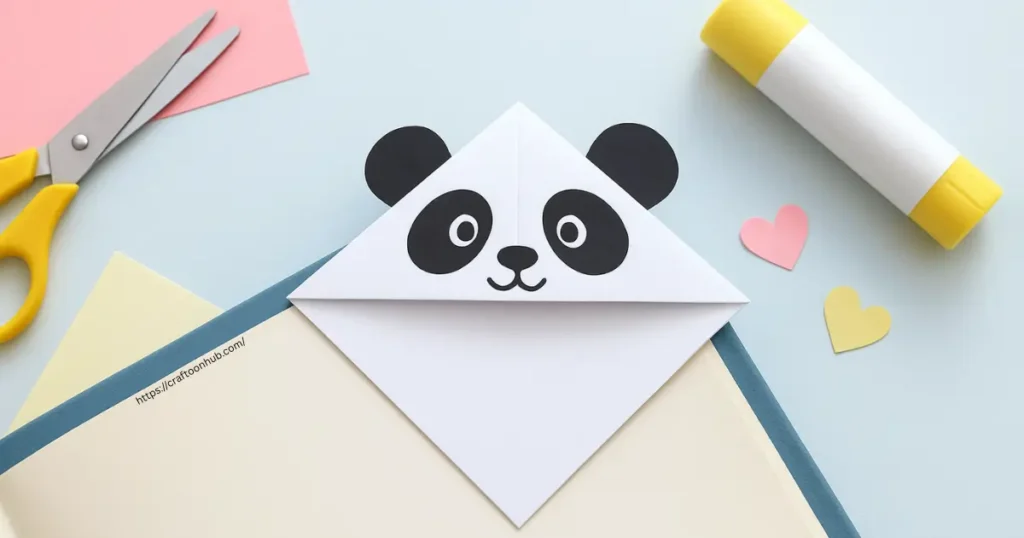
Looking for a fun, simple, and creative way to mark your favorite book pages? Easy Panda Corner Bookmark DIY is the perfect craft for kids, beginners, and even adults who love cute paper projects. With just a few materials like paper, scissors, glue, and a pen, you can make an adorable panda bookmark that fits neatly on any corner of your book. This step-by-step tutorial is easy to follow and guarantees a charming result. Not only is it a practical Easy Paper Bookmark Craft, but it’s also a delightful way to spend time being creative and crafty.
Easy Panda Corner Bookmark DIY
Creating an Easy Panda Corner Bookmark DIY is a simple and enjoyable paper craft project anyone can try. This tutorial transforms a small piece of paper into a cute, functional bookmark that fits perfectly on the corner of any page. It’s perfect for kids, beginners, or anyone who enjoys adorable DIY crafts. With just a few folds, some creativity, and a little decoration, you can make a charming panda bookmark that adds personality to your books and makes reading even more fun.
Materials You Will Need
Before you start folding, gather these materials:
- White paper (3cm x 3cm for small bookmarks; can adjust for larger sizes)
- Black paper for the panda’s ears
- Scissors
- Glue
- Black sketch pen
- Optional: colored pens for extra decoration
These simple materials are enough to create a charming Handmade Panda Bookmark Idea that will make reading more enjoyable.
Step-by-Step Origami Corner Bookmark Tutorial
Follow these steps carefully, and you’ll have a neat panda bookmark in no time:
Step 1: Prepare Your Paper
Take a white paper and cut it into a 3cm x 3cm square. This will be the base for your bookmark. Cutting the paper into a perfect square is important, so take your time to ensure accuracy.
Step 2: Create the Triangle Base
Fold the paper from one corner to the opposite corner to form a perfect triangle. Press gently with your finger to make a sharp crease. This triangle will serve as the base of your bookmark. Place the triangle with the longest side (the base) facing you. The pointed tip should be at the top, and the right angle should point upward.
Step 3: Fold the Bottom Corners
Fold the bottom right corner of the triangle upward so its point meets the top tip of the triangle. Do the same with the bottom left corner. Both sides should meet neatly at the top. Press gently to form clean creases.
Step 4: Open the Folded Corners
Next, open both corners back down. These crease marks will guide the next step, so don’t skip this part. Proper creasing ensures your bookmark will hold its shape.
Step 5: Form the Pocket
Take only the top layer of the triangle and fold it downward toward the base. Be careful not to fold both layers. This fold creates the pocket, which is the main part of your bookmark.
Step 6: Tuck the Corners
Take the right corner and fold it upward, tucking the top part into the pocket you just created. Repeat with the left corner. Ensure both sides are tucked evenly and press lightly to keep the folds in place.
Step 7: Admire Your Base Bookmark
Congratulations! Your basic corner bookmark is ready. It’s simple, elegant, and fits neatly on any book page.
Step 8: Add the Panda Design
Now, take black paper and cut out small panda ears with scissors. Attach them to the top back of the bookmark using glue. Use a black sketch pen to draw the panda’s eyes, nose, and mouth.
Your cute panda bookmark is now ready to make reading even more fun!
Tips for Perfect Folding
- Make sharp creases using your finger or a bone folder.
- Keep folds aligned to make the pocket symmetrical.
- Use good quality paper for durability.
- Decorate the panda with minimal but precise details—less is more.
- Experiment with different paper colors for variety.
Why Make This Bookmark?
- Personalized Gift: Handmade bookmarks make thoughtful presents.
- Kids’ Craft Activity: Fun and simple project for children.
- Decorative and Functional: Cute and practical for marking pages.
- Stress-Relieving: Folding paper and designing can be relaxing.
Creating a Panda Corner Bookmark DIY combines creativity with utility and is a great introduction to origami for beginners.
Other Creative Variations
- Use colored paper instead of white for themed pandas.
- Add glitter or stickers for extra fun.
- Make a set of bookmarks featuring different animals using the same folding technique.
- Personalize bookmarks with names, favorite quotes, or designs.
Conclusion
Making a Panda Corner Bookmark DIY is a fun way to add creativity to your reading routine. With this Easy Paper Bookmark Craft, you can create Cute DIY Bookmarks for Kids or even a small collection for yourself. Following this Origami Corner Bookmark Tutorial and adding the panda design transforms a simple piece of paper into a charming and functional bookmark. This Handmade Panda Bookmark Idea is fun, practical, and adds a personal touch to your books.
Try it yourself, share with friends, and enjoy the simple joy of DIY paper crafts!
FAQ Related to:
How do I make an easy panda corner bookmark at home?
You can make an easy panda corner bookmark at home with just a small square of paper, scissors, glue, and a pen. Start by folding the paper into a triangle, then create a pocket by folding the top layer. After that, tuck the corners to secure it. Finally, cut panda ears from black paper, attach them, and draw the eyes, nose, and mouth. This simple DIY project is fun, creative, and perfect for kids or beginners.
What materials are needed for a simple origami panda bookmark?
For a simple origami panda bookmark, you’ll need a small square of white paper, black paper for the ears, scissors, glue, and a black pen for drawing facial details. Optional items include colored pens or markers for extra decoration. These materials are easy to find at home or in craft stores, making it a quick and accessible paper craft project.
Can kids make a panda corner bookmark by themselves?
Yes! Kids can easily make a panda corner bookmark, especially with a step-by-step guide. The folding is simple, and decorating with the panda’s face can be a fun creative activity. Younger children may need a little help with scissors or glue, but overall, it’s a safe and enjoyable craft that encourages creativity and fine motor skills.
What is the step-by-step tutorial for an easy paper bookmark craft?
The tutorial starts with cutting a square piece of paper and folding it into a triangle. Next, fold the bottom corners upward, then open them to form crease guides. Fold the top layer down to create a pocket, and tuck the corners inside to secure it. Finally, add panda ears and draw the face to complete your cute corner bookmark. It’s a simple process that anyone can follow.
How do I decorate a corner bookmark to look like a cute panda?
To make your corner bookmark look like a panda, cut two small ears from black paper and glue them to the top corners. Use a black pen to draw the panda’s eyes, nose, and mouth. You can also add small blush spots or colorful details for extra charm. Keeping the design simple ensures the panda looks clean and adorable on your bookmark.
Are there creative variations for making handmade panda bookmarks?
Yes! You can use colored paper to make different panda themes, add glitter or stickers, or create a set featuring other animals using the same folding technique. You can also personalize your bookmarks with names, quotes, or doodles. These variations make the bookmarks more fun, unique, and perfect for gifting or decorating your own books.