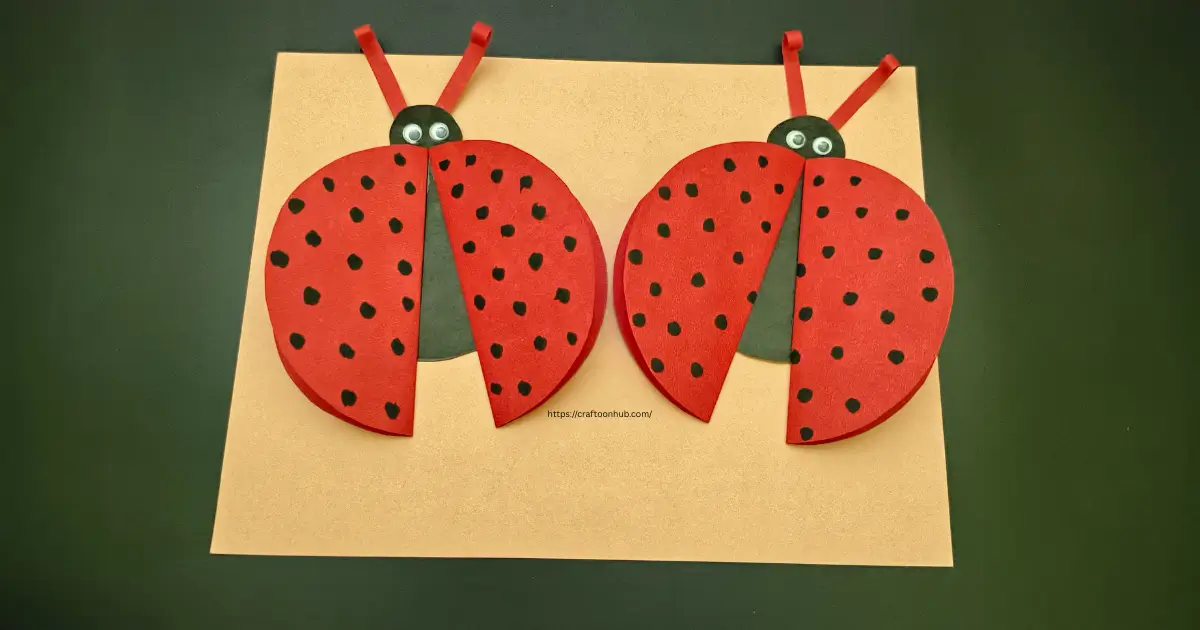
If you’re looking for a fun, creative, and educational indoor activity, this Easy Paper Ladybird Craft for Kids to Make at Home is the perfect project! Crafting not only keeps children happily engaged but also enhances their creativity, focus, and fine motor skills. With just a few simple materials—colored paper, scissors, and glue—kids can design their very own bright and cheerful ladybird. This paper ladybird craft is simple enough for beginners yet exciting enough to spark imagination. Whether you’re a parent planning a weekend activity or a teacher organizing an art session, this DIY ladybird paper craft is a must-try idea for every little creator!

Why Choose a Ladybird Craft?
Ladybirds (or ladybugs) are one of the most loved insects by children. Their bright red color and black dots make them a fun subject for crafts. Creating a paper ladybird craft not only teaches kids about insects but also introduces them to the joy of DIY creativity.
Moreover, this project is beginner-friendly and suitable for all age groups—especially for preschoolers and kindergarten kids. If you’re searching for ladybird craft ideas for preschoolers, this one fits perfectly because it’s colorful, simple, and quick to make.
Materials You’ll Need
Before starting your DIY ladybird paper craft, gather these easy-to-find materials:
- 1 sheet of thick black craft paper
- 1 sheet of red A4 size paper
- Scissors
- Glue stick or liquid glue
- Pencil and compass
- Googly eyes (2 pieces)
- Black marker or sketch pen
You probably have most of these items at home already. If not, they are easily available at any local stationery or craft store.
Step for Easy Paper Ladybird Craft for Kids to Make at Home
Now, let’s make your easy ladybird craft for kids. Follow these simple steps carefully to get the perfect result.
Step 1: Prepare the Black Body
Take a thick black craft paper. Draw a circle with a 4.5 cm radius using a pencil and compass. Carefully cut it out with scissors. This circle will form the main body of your ladybird.
Step 2: Create the Red Wings
Next, take a red A4 size sheet. Fold it neatly in half. Now, draw two circles, each with a 6 cm radius. Using scissors, cut out both circles. These will become the ladybird’s wings.
Once you’ve cut them, fold each red circle halfway in the center to create a curved wing shape. This small fold helps the wings look more realistic when attached.
Step 3: Make the Ladybird’s Head
On the black craft paper, draw a small oval shape for the bug’s head and cut it out. This will be placed at the top of the body.
Step 4: Assemble the Body and Wings
- Now it’s time to put it all together! Take the 4.5 cm black circle (the body) and place it on a flat surface. Apply glue to the upper side of the black circle.
- Then, carefully attach both red circles slightly overlapping at the top, so that the black body shows between the wings—just like in real ladybirds.
Step 5: Attach the Head
Take the oval black head and apply a small amount of glue at the bottom of it. Place it slightly behind the top part of the large black body circle. Hold it gently for a few seconds to stick properly.
Step 6: Add Eyes and Antennae
- Now, take two googly eyes and stick them on the head. If you don’t have googly eyes, you can draw them using a white and black pen.
- To make the antennae, cut two thin red strips of paper (around 5–6 cm long). Apply glue at one end of each strip and stick them behind the head. Once the glue dries, slightly curl the antennae downward in a circular motion for a fun look.
Step 7: Add Black Dots
Finally, take a black marker or sketch pen and draw small dots on the red wings. These dots complete your ladybird’s signature look. Make sure the dots are evenly spaced for a neat design.
And that’s it! Your DIY ladybird paper craft is now complete.
Learning Benefits for Kids
Crafting is more than just play—it’s a learning tool. This simple bug craft for kids offers multiple benefits:
- Improves Fine Motor Skills: Cutting, gluing, and folding strengthen hand muscles.
- Boosts Creativity: Choosing colors, decorating dots, and creating unique designs spark imagination.
- Enhances Focus: Kids learn to follow steps carefully while completing the project.
- Encourages Communication: Children love explaining what they made, boosting confidence and language skills.
- Promotes Learning About Nature: Through this ladybird project, kids learn about insects in a fun and creative way.
Tips to Make Your Paper Ladybird More Fun
- Try using colored craft papers like pink, blue, or yellow for a unique version.
- Add glitter dots to make your ladybird sparkle.
- Use magnets or threads to turn the ladybird into a fridge magnet or hanging decoration.
- If making in school, let kids write their names on the back to personalize their work.
- Pair this with a storytelling activity about bugs to make it educational and entertaining.
Perfect for Preschool and Home Activities
If you’re a parent or teacher searching for ladybird craft ideas for preschoolers, this fun project is an excellent choice. It’s safe, simple, and requires only basic scissors and glue, allowing kids to participate confidently in every step. This activity not only enhances creativity but also encourages independence and focus in young learners. At home, it becomes a joyful weekend bonding project for families. You can even create multiple ladybirds and design a colorful bug garden on cardboard, turning this paper ladybird craft into a beautiful display of imagination and teamwork.
Cleanup Made Easy
Once the craft is complete, cleaning up is simple. Collect paper scraps, store unused materials, and wipe glue spots from the table. Teaching kids to clean up after crafting helps them learn responsibility and organization.
Safety Tips for Kids
- Always supervise children while using scissors.
- Use non-toxic glue safe for kids.
- Avoid tiny parts like small beads for toddlers, as they can pose a choking risk.
Why This Ladybird Craft Stands Out
Unlike many complicated craft projects that require special tools or a lot of time, this easy ladybird craft for kids stands out for its simplicity and charm. It can be completed in less than 30 minutes, making it ideal for short art sessions or weekend fun. The bright red and black colors instantly attract children’s attention, while the simple cutting and gluing steps make it a perfect activity for beginners. Even toddlers and preschoolers can participate with a little guidance, turning craft time into a joyful learning experience.
What makes this simple bug craft for kids truly special is how it combines creativity, skill-building, and fun learning all at once. It encourages children to explore art while improving coordination and focus. Whether it’s a rainy afternoon, a classroom art project, or a summer camp activity, this paper ladybird craft adds a burst of color, excitement, and accomplishment to every child’s day.
Conclusion
Creating an Easy Paper Ladybird Craft for Kids to Make at Home is more than just an art project—it’s a joyful way to spark imagination and creativity in children. With only paper, scissors, and glue, kids can turn simple materials into something bright, cheerful, and full of personality. This fun activity helps them express ideas, develop focus, and enjoy the satisfaction of making something on their own.
Encourage your little artists to play with colors, add patterns, or even design their own bug family! Every ladybird will be beautifully unique—just like your child’s creativity. So, gather your supplies, spread out your craft papers, and let the fun begin today.
Try this DIY ladybird paper craft now and share your creations online! Tag your photos with #ladybirdcraft to inspire others and spread the joy of crafting with kids.
FAQ Related to:
How do you make an easy paper ladybird craft for kids at home?
To make an easy paper ladybird craft at home, start with a sheet of black craft paper and red A4 paper. Cut a black circle for the body and two red circles for the wings. Attach the wings to the body using glue so that part of the black circle shows in between. Add a small black oval head, glue on googly eyes, and draw black dots on the wings. Finally, cut two thin paper strips for antennae and glue them behind the head to complete your ladybird.
What materials are needed for a simple bug craft for kids?
You’ll need basic materials such as red and black colored paper, scissors, glue, a pencil, a compass, googly eyes, and a black marker. These items are easy to find at home or in a craft store. All the materials are child-friendly and suitable for preschoolers, making the activity both fun and safe.
How can preschoolers safely make a ladybird craft using paper and glue?
Preschoolers can make this ladybird craft safely with adult supervision. Use child-safe scissors with blunt edges and non-toxic glue. Pre-draw the shapes for them if needed, and let children handle the folding, gluing, and decorating. Always keep small items like googly eyes out of reach of toddlers who might put them in their mouths. With simple steps and guidance, this craft becomes both enjoyable and safe for young children.
What are some fun ladybird craft ideas for preschoolers and toddlers?
Preschoolers can make a variety of ladybird-themed crafts, such as paper ladybird masks, painted ladybird rocks, or paper plate ladybugs. You can also help them create ladybird bookmarks, greeting cards, or wall decorations. Using different materials like colored paper, buttons, or fabric makes the project even more creative and engaging.
Why is a DIY ladybird paper craft a good learning activity for kids?
A DIY ladybird paper craft teaches children important skills like following instructions, hand-eye coordination, and fine motor control. It also encourages creativity as kids choose colors, shapes, and decorations. Additionally, this activity introduces them to insects in an enjoyable, hands-on way, helping them connect learning with play.
How can I make my paper ladybird craft more colorful and creative?
You can personalize your paper ladybird craft by experimenting with colors, patterns, and decorations. Try using glitter paper, colored dots, or decorative stickers to enhance the look. Instead of the traditional red and black, let children pick bright colors like blue, pink, or yellow. Adding a cardboard garden background or a family of ladybirds also makes the craft more imaginative and visually appealing.