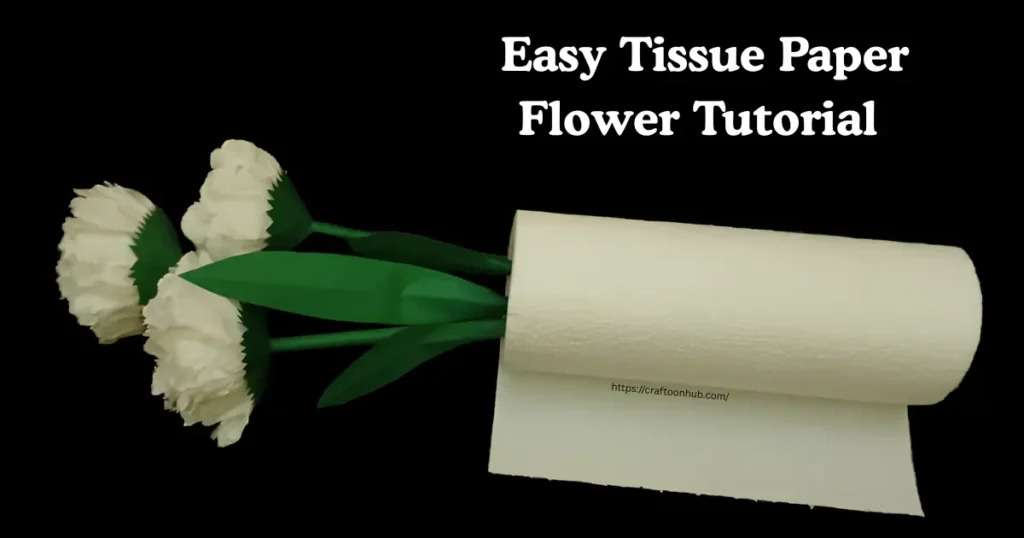
If you are searching for a simple, creative, and affordable craft idea, this Easy Tissue Paper Flower Tutorial for Beginners will guide you step by step. With just a few materials like napkins, green A4 paper, scissors, thread, and glue, you can create a beautiful handmade flower that looks soft and elegant. This tutorial is designed for everyone—kids, beginners, and even experienced crafters who love making paper flowers. The steps are easy to follow, enjoyable to make, and perfect for home décor, gifts, school projects, or craft hobbies. Let’s begin this fun and beginner-friendly craft journey.
Why Tissue Paper Flowers Are a Perfect Craft Choice
Tissue paper flowers have a charm that real flowers sometimes cannot offer. They last long, are budget-friendly, and can be made in any color you like. They are also lightweight, easy to handle, and extremely customizable. Because of these advantages, many people love making them for room decoration, party decor, weddings, gifts, classrooms, or simple creative fun.
Another reason they are so popular is that they require very basic materials. A napkin or tissue paper is enough to design a fluffy, realistic flower. This makes it ideal for people who want a good result without spending much money.
Materials Required
Collect the materials below before you start the craft:
- White tissue paper or napkin
- Green A4 paper
- Scissors
- Thread
- Glue
- Glue gun
- Pencil (optional for shaping)
These simple materials are easy to find and perfect for this project.
Easy Tissue Paper Flower Tutorial for Beginners
Let’s start making your flower. The instructions below are written clearly and simply, based exactly on the steps you provided.
1. Take the Tissue Papers
Start by taking a tissue paper roll and remove three sheets of tissue from it. Separate each sheet carefully so they don’t tear.
2. Cut the Papers in Half
- Fold each sheet lightly and cut it from the center to make two equal parts.
- After doing this, you will have five pieces (from your separated sheets).
3. Fold the Papers as Shown in the Given Video
- Take all five pieces together.
- Now fold them exactly the way shown in the given video.
- Follow the same folding style, shape, and direction. This folding step helps create the shape of your petals later.
4. Cut the Edges into a Round Shape
- Once the folding is complete, cut both ends in a soft round shape.
- This rounded edge will give your flower smooth, natural-looking petals.
5. Open the Paper Carefully
- Now gently open the folded paper. Do it slowly so the paper doesn’t tear.
- Follow the same opening method shown in given video.
6. Tie the Center with Thread
- Take a thread and tie it around the middle of the folded paper.
- Make sure the thread is tight so the flower doesn’t loosen, but not so tight that it damages the paper.
7. Spread Each Layer to Form the Flower
- Start lifting one layer at a time to form the petals.
- Pull each sheet upward gently.
- Continue spreading and lifting until all layers open and the flower becomes fluffy and round.
At this point, your white tissue paper flower is complete.
Making the Flower Stem (Green A4 Paper)
Now let’s give your flower a beautiful green stem.
1. Roll the Green Paper
- Take a green A4 sheet.
- Start rolling it from one corner and continue rolling until you reach the opposite end.
- This forms a long and strong stem.
- Use glue or a glue gun to secure the last edge so it stays rolled tightly.
2. Attach the Stem to the Flower
- Apply a small amount of glue gun at the bottom of your flower.
- Place the top end of the rolled stem onto the glue and press lightly.
- Hold it gently for a few seconds so it attaches firmly.
Adding the Green Base (Calyx)
1. Create the Green Bottom Part
- Cut a 5 cm square from the green A4 paper.
- Draw a circle inside this square and cut it out.
- Cut this circular piece the same way shown in the given video, as it will form the green base under your flower, just like the calyx in real flowers.
2. Attach It
- Place glue around the stem area under the flower and stick this green circle there.
- Press gently so it holds nicely.
Making the Leaves
1. Cut Long Leaf Shapes
- Take the remaining green paper and cut out long leaf shapes.
- Fold each leaf slightly in the middle to give it a natural crease.
2. Glue the Leaves to the Stem
- Apply glue and stick the leaves neatly to the stem.
- Place them slightly below the flower for a balanced look.
Now your beautiful handmade flower is completely ready!
Why This Simple Paper Flower Craft Tutorial Works for Everyone
This craft is simple enough for beginners and interesting enough for experienced DIY lovers. You don’t need artistic skills—just patience and willingness to try. Because it uses commonly available materials, anyone can make it at home without special preparation.
This Simple Paper Flower Craft Tutorial is especially helpful for kids, school projects, party decorations, wedding arrangements, home décor, or simply relaxing creative time. It teaches patience, creativity, and focus while giving you a beautiful result.
Benefits of Tissue Paper Flower Making
- Budget-Friendly: You don’t need to buy expensive craft materials. Tissue paper is cheap and easily available.
- Beginner-Friendly: This project is a great choice for Tissue Paper Flower Making for Beginners. The steps are easy to understand and follow.
- Versatile Decoration: Use these flowers for parties, gifts, rooms, photo frames, bouquets, or centerpieces.
- Unlimited Creativity: You can experiment with different colors, shapes, sizes, and layers.
Additional Tips to Enhance Your Flower
1. To improve your craft further:
- Use Multicolor Napkins
- This adds a beautiful gradient effect to your flower.
2. Add More Layers
- If you want a fuller flower, increase the number of tissue layers.
- Shape the Petals Differently
- Try heart-shaped, pointed, or oval cuts.
3. Add Glitter or Paint
- Soft touches of glitter make the flower shine.
Common Mistakes and How to Avoid Them
- ❌ Paper Tearing
- ✔ Open layers gently. Use thicker napkins.
- ❌ Stem Not Holding
- ✔ Apply extra glue or roll the stem tighter.
- ❌ Flower Looks Flat
- ✔ Add more layers or fluff the petals more carefully.
- ❌ Leaves Look Stiff
- ✔ Fold each leaf lightly to soften the look.
Conclusion
Creating this Beginner-Friendly Tissue Paper Flower DIY is a joyful and relaxing experience. With just napkins, green paper, scissors, thread, and glue, you can make a stunning flower that brings beauty to any space. This craft teaches creativity, patience, and the joy of making something with your own hands.
If you enjoyed this Easy Tissue Paper Flower Tutorial for Beginners, try making more flowers in different colors and styles. Share this craft with friends, follow along with more tutorials, and don’t forget to create your own versions. I’d love to see your beautiful flowers—feel free to send pictures or tag me online!
FAQ Related to:
How can beginners make an easy tissue paper flower at home?
Beginners can easily make a tissue paper flower by using simple materials like napkins, green paper, scissors, thread, glue, and a glue gun. Just cut the napkin layers, fold them as shown in the video, shape the edges, tie the center with thread, and gently open each layer to form petals. Add a green stem and leaves to finish the flower. It’s a quick and fun craft for anyone.
What materials do I need for a simple paper flower craft tutorial?
You only need a few basic supplies:
Tissue paper or napkins
Green A4 paper
Scissors
Thread
Glue or glue gun
These materials are affordable, easy to find, and perfect for beginners who want to try paper flower crafting.
How do I make a DIY napkin flower step by step?
Start by taking three layers of tissue paper and cutting them into equal pieces. Fold the pieces exactly as shown in the video, round the edges, and open the layers one by one. Tie the center with thread so the petals stay in place. Then create a green stem and attach it under the flower. Add leaves, and your DIY napkin flower is ready.
How do I attach a stem and leaves to a tissue paper flower?
Roll the green A4 paper tightly to create a sturdy stem. Use glue or a glue gun to fix it to the bottom of the flower. Then make simple leaves from the remaining green paper and glue them onto the stem. Hold everything for a few seconds to make sure it sticks well.
Why is my tissue paper flower not opening or looking fluffy?
If your flower isn’t opening properly, the layers may be too thick or not folded evenly. Also, you might be pulling the petals too quickly. Try lifting each layer gently one by one. If the edges aren’t rounded enough, the flower may look flat—so shaping the edges nicely makes a big difference.
How can I make beautiful napkin flowers for decoration quickly?
To make beautiful napkin flowers fast, prepare all the napkin pieces in advance, cut them together, and follow a simple folding method like in the video. Use thread to secure the center tightly and open the layers carefully. Adding a neat green base, stem, and leaves will make the flower look professionally made.